technical data Synchronous Belts and Belt Sprockets
Instructions for use (Lock Belt Sprockets S type and S-type plated specifications)
Installation
- 1) For S-type specifications
Wipe off any dirt from the shaft surface and apply a thin layer of oil or grease. (Do not use any products containing molybdenum-based anti-friction agents.)
Remove the sleeve tightening bolt and wipe the contact surfaces of the pulley and sleeve clean. Apply oil or grease.
Also, apply oil or grease to the threads and seat of the tightening bolts. Applying oil or grease will ensure stable bolt tightening force, so be sure to apply it.
If not applied, it may cause insufficient transmission torque or bolt loosening. - 2) For S-type plating specifications
Completely wipe off any dirt or oil from the shaft surface. Remove the sleeve tightening bolt and wipe the contact surfaces of the pulley and sleeve clean.
Do not apply oil or grease as this is not necessary.
In addition, the bolts have been specially coated in advance to achieve the same effect as applying oil or grease, so please do not apply any other oil or grease. - 3) Lightly tighten the fastening bolts to temporarily assemble the sleeve.
- 4) Gently push Lock Belt Sprockets that you temporarily assembled in step 3 into the designated position by hand.
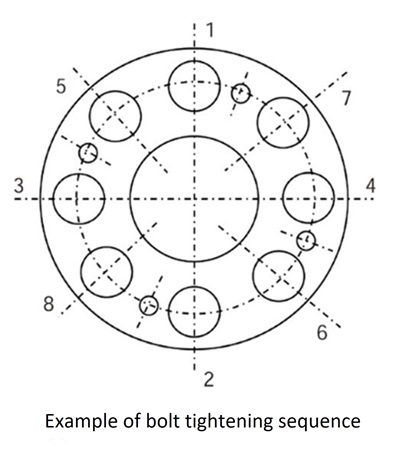
- 5) Tighten the bolts evenly in diagonal order using 1/4 of the rated tightening torque M A.
- 6) Increase the tightening torque to 1/2 of M A and tighten in the same way as in 5).
- 7) Increase the tightening torque to the rated value and tighten in the same way as steps 5) and 6).
- 8) Tighten all the tightening bolts in the circumferential direction in turn with the rated tightening torque. Repeat this process several times.
Installation is complete when all the tightening bolts are fully tightened to the rated tightening torque.
Installation precautions
- - Always use a torque wrench to tighten the clamping bolts. Follow the tightening instructions and tightening torque M A. Using a wrench other than a torque wrench or tightening by hand will result in inaccuracy and may cause accidents such as slippage or deformation.
- - Tightening a bolt with a torque greater than the specified torque may cause the bolt to break. Tightening a bolt with a torque less than the specified torque may cause the bolt to loosen, so be sure to tighten it to the specified torque MA.
- ・Never use any tightening bolts other than those provided with this product. This may result in damage to the bolts or other accidents. If you need new bolts due to loss or replacement, please contact us.
Removal
- 1) After making sure that no load such as torque is being applied to the pulley and shaft, loosen the tightening bolts one by one and remove them.
- 2) Insert the removed bolts into the removal screw holes and tighten them evenly to release the lock.
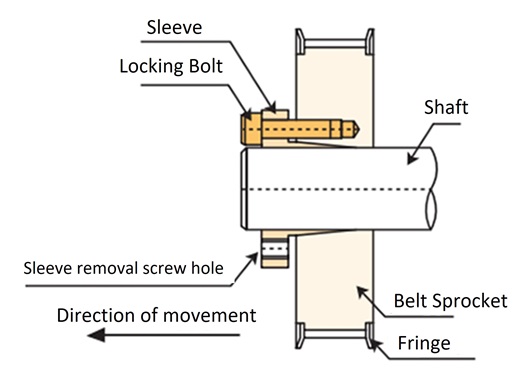
Pulley movement when tightening bolts
When Lock Series S type is installed, the pulley will move 0.5mm to 1.0mm in the axial direction from the initial fixation to the final tightening.
Therefore, when centering, please take into account the amount of pulley movement before installing.
For the direction of pulley movement, please refer to the diagram on the right.
General notes
- 1) Allowable transmission torque: Select the load torque so that the maximum torque generated multiplied by Service factor is always equal to or less than the transmission torque.
- 2) Shaft diameter tolerance and surface roughness: The shaft diameter tolerance should be h8 and the shaft surface roughness should be Ra 3.2.
- 3) Mounting to a key groove shaft or D-shape shaft
When mounting on a shaft that already has a keyway, such as a motor shaft, or on a D-shaped shaft, the allowable transmission torque will be reduced by 10%. - 4) Mounting on polished steel bars
When attached to polished steel bars with guaranteed mechanical properties (drawn material dimensions allowable diameter class 8 to 10), the allowable transmission torque will be reduced by 10%. - 5) Use a solid shaft material of S35C or higher.
- 6) Operating temperature range: -15°C to 80°C (aluminum: 0°C to 50°C)
- 7) Always use a torque wrench when tightening bolts.
(Please use the torque wrench correctly according to Instruction Manuals of the torque wrench you are using.)
[Unplated Aluminum] Bolts and tightening torque M A
| Sleeve frame number | Bolt size | Bolt tightening torque N・m {kgf・m} |
|---|---|---|
| S1 | M4x16 | 4.2 {0.43} |
| S2 | M5x18 | 8.3 {0.85} |
| S3, S4 | M5x20 | |
| S5 | M5x22 | |
| S6 | M6x25 | 16.8 {1.71} |
| S7 | M8x30 | 40.5 {4.13} |
[Plating specifications] Bolts and tightening torque M A
| Sleeve frame number | Bolt size | Bolt tightening torque N・m {kgf・m} |
|---|---|---|
| S1 | M4x16 | 3.4 {0.35} |
| S2, S3, S4 | M5x20 | 6.8 {0.69} |
| S5 | M5x25 | |
| S6 | M6x25 | 13.6 {1.39} |
| S7 | M8x30 | 32.8 {3.35} |