technical data Drive chain Roller Chain Handling
You can also watch a video on how to splice and cut roller chains.
Drive chain Maintenance / handling page
Table of contents
1. How to cut a roller chain
Roller chains need to be cut to the required length.
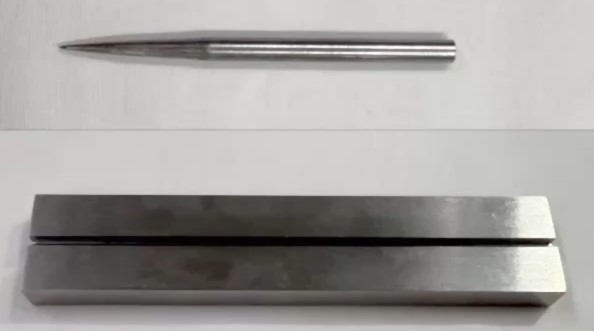
1.1 How to use a chain vise and punch
- 1. For roller chains with RP body pin type, grind down one end (on the same side) of the two pins on outer link until they are flush with the plate.
Avoid overheating the chain when grinding.
Poly-steel chain do not have rivets, and there is no need to scrape them off.
RS08B-1 to RS16B-1 use pins with simple cut and connect specifications. There is no need to scrape off the pin fastening rivet. - 2. For roller chains with a CP body pin type, remove the cotter pin or other fastening parts.
Figure 1. Rivet-type roller chain
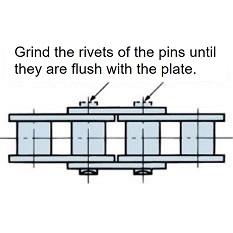
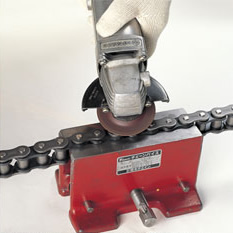
Figure 2. Shaving the end of the pin
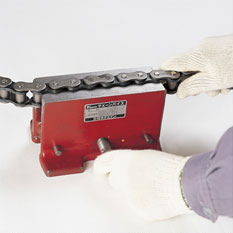
- 3. Pass the roller chain through the groove in the chain vise, and lightly tighten the roller of the part to be disassembled with the jaws of the chain vise.
Poly-steel chain and Lambda Chain, please follow the procedures in sections 1.3 and 1.4.
For multiple strand Super chain, pass the lowest roller through the jaws of the chain vise.Figure 3. Setting the roller chain in the chain vise
Super chain Set

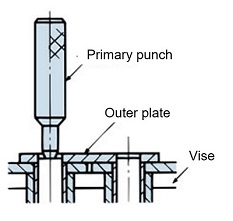
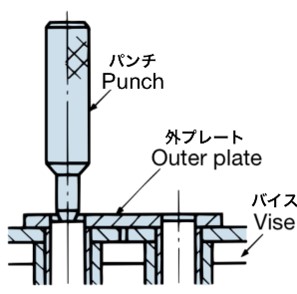
- 4. Place a primary punch that matches the size of the roller chain on the head of the pin that you have just cut, and hit the head of the primary punch with a hammer.
At this time, alternately strike the pair of pins on outer link so that they come out parallel to each other. Continue striking until the pins are just about to come out of the outer plate.Figure 4. Hitting the pin with the primary punch
- 5. Use a secondary punch and hammer to remove the pair of pins from the outer plate.
1.2 When using chain screws
- 1. For roller chains with RP main pin type, grind off one end (same side) of the two pins on outer link with a grinder (same procedure as in 1.1).
For roller chains with a CP body pin type, remove the cotter pin and other fastening parts. - 2. Remove the two pins from the same outer link.
Figure 5. Cutting with a chain screw
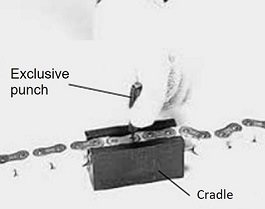
1.3 How to cut Poly-steel chain
- 1. Support the outer plate of the chain on the support, hold the head of the pin with the special punch, and lightly hit the head of the punch with a hammer.
- 2. Apply a large amount of force to Inner link to prevent damage.
Figure 6. Poly-steel chain set on the support
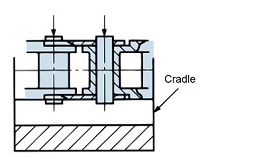
Figure 7. Disassembly of Poly-steel chain
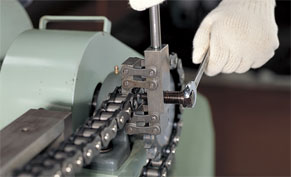
1.4 How to cut Lambda Chain
- 1. For roller chains with RP main pin type, grind off one end (same side) of the two pins on outer link with a grinder (same procedure as in 1.1).
For roller chains with a CP body pin type, remove the cotter pin and other fastening parts. - 2. Use the cradle and dedicated punch of Lambda Chain cutting tool to cut the chain. The cutting method is as described in section 1.1, except that the dedicated cradle is used instead of the vise.
- 3. When removing the pin with a punch, tap it gently alternately to remove it.
⚠Caution when disconnecting
- 1. For RP type pins, it is necessary to remove the rivet portion from one end of the pin. If you remove the pin as is, it will be more time-consuming and may damage the chain.
- 2. The chain screw is a special tool for disassembling roller chains. It allows you to disassemble roller chains without removing the chain from the equipment.
Support the roller chain's own weight in advance to prevent it from falling if it breaks. - 3. Check that the bushing in the area where the pin was removed is not missing or deformed. If you find any missing bushings or deformation in the part, do not use that part.
- 4. Do not reuse any removed parts.
2. How to splice roller chains
2.1 When connecting at the sprocket teeth
When connecting roller chains, it is convenient to use the sprocket teeth. Follow the steps below.
- 1. Wrap the roller chain around the sprocket so that both ends of the roller chain are on the sprocket.
- 2. Insert the connecting link into the joint.
- 3. Insert connecting link plate and then secure it with a fastening part such as spring clip, split pin, or spring pin.
- 4. For F-type connecting links, lightly tap connecting link plate with a hammer to insert it into the specified position, then secure it with a fastening part such as a spring pin.
- 5. Protect the sprocket teeth from being struck by hammering, etc.

Figure 8. Joining at the sprocket
2.2 Splicing between shafts
This is a method when sprocket teeth cannot be used due to layout restrictions.
- 1. Wind the roller chain around the sprocket and pull both ends of the roller chain with Chain Puller (see accessories) or wire.
- 2. Insert the connecting link into the joint.
- 3. Insert connecting link plate and secure it with fastening parts such as spring clip, split pins, or spring pins.
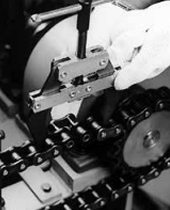
Figure 9. Joining shafts
2.3 spring clip and split pins
1. spring clip
spring clip are primarily used on connecting links of roller chains RS60 and below.
When connecting, insert the connecting link plate onto the pin, then securely insert spring clip into the grooves of the two pins on the connecting link.
If spring clip is stretched too far, it will not insert properly and will fall off.
spring clip should generally be attached in the direction of the roller chain movement as shown in Figure 10.
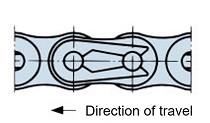
Figure 10. spring clip installation direction
2. Cotter pin
With the exception of some environmentally resistant and special Drive chain Drive chain the split pins used are heat treated.
The split pin should be opened at an angle of about 60°. Do not reuse split pins or use commercially available split pins.
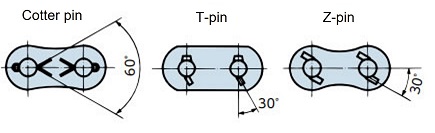
Figure 11. Installing the retaining parts
RS roller chain Cotter Pin Dimensions (Roller Chain Only)
| Size | Cotter pin nominal dimensions |
|---|---|
| RS35 | 1 × 6 |
| RS40 | 1 × 6 |
| RS50 | 1.6 × 8 |
| RS60 | 2 × 10 |
| RS80 | 2.5 × 14 |
| Size | Cotter pin nominal dimensions |
|---|---|
| RS100 | 2.5 × 20 |
| RS120 | 3 × 23 |
| RS140・RS160 | 4 × 24.5 |
| RS180 | 5 × 32 |
| RS200 | 5 × 37 |
Note: RS240 does not have a split pin setting.
⚠Precautions when connecting
- 1. Avoid using offset links whenever possible. Adjust the center distance or use idlers to adjust the slack.
- 2. Avoid adjusting the length of a chain that has become elongated due to wear by cutting off the links.
- 3. For connecting links such as F-type connecting links where the pin and connecting link plate hole press fit, making the plate hole larger or the pin diameter smaller will reduce the strength of the chain.
Do not perform any additional processing. - 4. Once the outer plate has been removed, its strength will be reduced, so do not reuse it.
- 5. Connecting links, offset links, and other individual components are usually coated with anti-rust oil only. When assembling them into the main body, be sure to oil the surfaces of the pins and bushing holes.
3. How to cut and splice Epsilon Chain
You can also watch a video demonstrating how to cut and join Epsilon Chain.
Drive chain Maintenance / handling page
3.1 How to cut Epsilon Chain
Please prepare a stand and a dedicated punch for Epsilon Chain cutting tool. See below for Product Info.
- 1. Place the special punch against the head of the pin and lightly tap the head of the punch with a hammer. At this time, tap alternately so that the pair of pins on outer link come out parallel to each other.
- 2. Remove the pair of pins from the outer plate.
3.2 Disassembly method for Epsilon Chain coupling links
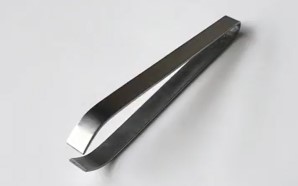
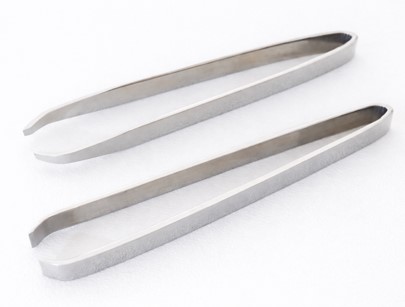
Please prepare a commercially available pair of tweezers with flat tips.
- 1. Align the flat-tipped tweezers as shown by the green line in the diagram below.
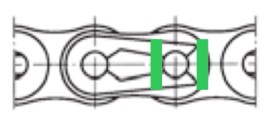
- 2. Use tweezers to pinch and remove the spring clip, imagining you are sliding it off.
3.3 How to connect the connecting links of Epsilon Chain
Please prepare two types of commercially available tweezers: one with a flat tip and one with a pointed tip.
- 1. Using pointed tweezers, insert the connecting link into the joint.
- 2. Insert connecting link plate, then secure it with spring clip.
Align the flat-tipped tweezers as shown by the green line in the diagram below.
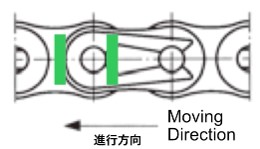
- 3. Use tweezers to grasp and attach the spring clip, imagining you are sliding it.

