technical data Drive chain Roller Chain Handling
7. Roller chain inspection
- 1. Generally, the life of a roller chain is determined to be when a part is damaged or the roller chain has undergone 1.5% elongation due to wear. Replace the roller chain before the end of its life.
- 2. As roller chains are used, the pins and bushings gradually wear down.
7.1 Inspection steps
| Steps | Method | Inspection items | For more details, please refer to the following page: |
|---|---|---|---|
| Step I | Visually check for any abnormalities in the operation. |
|
For inspection instructions, see below and Troubleshooting page. |
| Step II | Stop operation and inspect each part of the roller chain and sprocket thoroughly. |
|
|
| Step III | For more detailed inspection, the roller chain is removed and inspected using measuring equipment. |
|
7.2 Inspection intervals
We recommend that roller chains be inspected every month.
In the following cases, periodic inspections will be carried out at shorter intervals.
- 1. Places with a special or bad atmosphere
- 2. Sudden stops during high-speed driving
- 3. For suspended and intermittent operation
7.3 Inspection Procedure for Winding Transmission
1. Check the lubricate status
- 1-1. During operation, check that lubricating oil is entering the gap between the outer and inner plates.
The oil bath also checks whether the roller chain or rotating plate is immersed in lubricating oil. - 1-2. Insufficiently oiled roller chains generally have dirty surfaces with Wear debris.
Dirt is especially noticeable in the gaps between the plates. - 1-3. After removing the roller chain, inspect the connecting link pins and their ends, as well as the inside of the bushings on Inner link.
If the surface is peeling or is red or dark brown, it means that it is not being oiled enough.
2. Inspect the plate
- 2-1. When a roller chain is repeatedly subjected to a force greater than Maximum allowable load, it will suffer fatigue failure. It is difficult to detect early cracks caused by fatigue failure through external inspection.
- 2-2. Cracks generally occur from the edges or sides of the holes in the plate, as shown in Figure 25. Check closely for cracks. Fatigue failure progresses gradually, but can be detected by careful observation.
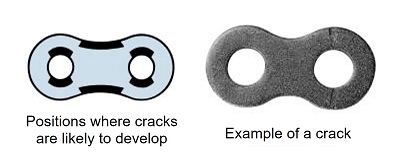
Figure 25. Crack in plate
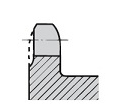
- 2-3. If the end face of the plate is worn due to sliding against a contact point such as a guide, correct the installation condition. The wear limit in this case is 5% of the plate height (Figure 26).
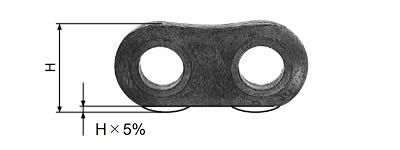
Figure 26: Wear on plate end surface
3. Check the pin
If the pin is rotating (Figure 27), replace the entire roller chain with a new one. The same goes for the connecting link pin. By removing the connecting link, you can check the wear and rust on the pin surface.
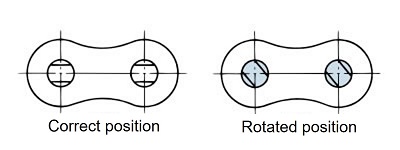
Figure 27. Rotating the pin
4. Check the rollers
- 4-1. As with plates, when a force greater than Maximum allowable load is applied to rollers, the repeated impact load with the sprocket increases, causing fatigue failure (Figure 28).
This will also be inspected in the same way as plate cracks.
Figure 28. Cracks in the roller
- 4-2. When the roller engages with the sprocket, especially if a foreign object gets caught in it, the roller will be damaged, which can become the starting point for fatigue failure.
Furthermore, when operating at high speeds, even if no foreign matter gets caught, cracks may occur due to collision with the sprocket tooth surface. - 4-3. If a roller chain has suffered fatigue damage, the entire roller chain should be replaced, as each part is subjected to the same repeated load.
- 4-4. Also check that the rollers are not rotating properly.
5. Sprocket inspection
- 5-1. To check whether the roller chain and sprocket are meshing properly, observe the state of contact between the rollers and tooth surfaces.
In normal meshing, the contact state is uniform as shown in A in Figure 29.
If the teeth are unevenly aligned as in B, or if the sides of the teeth are scraped off, the sprocket may not be properly installed or the roller chain may be twisted. Re-inspect and correct any problems. - 5-2. The normal contact position is slightly above tooth root (valley). As shown in Figure 29, a strong contact is seen at position A.
However, if initial tension is applied and there is tension on the slack side, it will also slightly contact tooth root. - 5-3. The idler and tensioner contact tooth root.
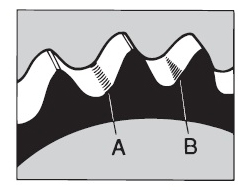
A: Normal B: Installation error
The sides of the teeth are being worn down
...improper installationFigure 29. Sprocket tooth contact
- 5-4. The life of a sprocket is reached when the wear on the teeth reaches the values shown in the table below.
For sprockets with hardened tooth tips, this occurs when the hardened layer is worn away.Tooth thickness usage limit/B dimension
RS roller chain
sizeB dimension B dimension Pin gear RS11-SS 0.6 - RS15 1.1 - RS25 1.5 - RS35 2.5 - RS41 2.6 - RS40 2.5 3.1 RS50 2.9 3.6 RS60 3.7 4.6 RS80 5.0 6.3 RS100 6.9 8.6 RS120 8.7 10.9 RS140 10.6 13.3 RS160 12.4 15.5 RS180 11.3 14.1 RS200 12.6 15.8 RS240 15.1 18.9 RF320-T 19.9 24.9 RF400-T 24.9 31.2 RS roller chain
size
BS/DIN standardB dimension general RF06B 1.6 RS08B 2.1 RS10B 2.9 RS12B 3.6 RS16B 5.0 RS20B 6.8 RS24B 7.2 RS28B 8.6 RS32B 11.9 RS40B 12.7 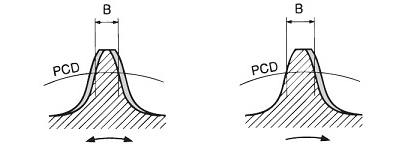
When rotating forward or reverse
When rotating in one direction
Figure 30. B dimension location
- 5-5. If a new roller chain is put on a worn sprocket, the roller chain will wear out rapidly.
When replacing with a new roller chain, be sure to also replace the sprockets at the same time.
6. Check the chain for elongation
- 6-1. Roller chains do not elongate due to deformation of the plates, but rather due to wear of the sliding surfaces of the pins and bushings, which increases play and causes the chain to elongate overall.
Therefore, by measuring the elongation of the roller chain periodically, it is possible to predict its lifespan. - 6-2. Measurement procedure
- (1) To remove any play in the entire roller chain, measure while it is tensioned to a certain extent.
- (2) As shown in the figure, measure the inner (L1) and outer (L2) distances between the rollers of the number of links to be measured, and determine the judgment dimension (L).
L = L1 + L2 2
- (3) When measuring, measure approximately 6 to 10 links to minimize measurement error.
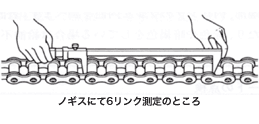
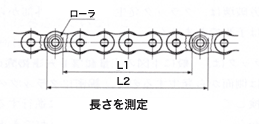
Figure 31. Length measurement
- (4) Next, calculate the chain elongation.
Chain elongation = Judgment dimension - Reference length Reference length x 100 (%)
Reference length = chain pitch x number of links
- (5) multiple strand roller chains are treated in the same way as single strand roller chains of the same pitch.
- (6) If smooth roller chain transmission is desired, the usage limit due to roller chain elongation is as follows:
Elongation usage limit Large sprocket tooth count Chain elongation 60 teeth or less 1.5% 61 to 80 teeth or less 1.2% 81 to 100 teeth or less 1.0% 101~110 0.8% - (7) The reference length (chain pitch x number of links) and the judgement dimensions for 1.5% elongation are as shown in the table below.
- (8) If you cannot measure the length of the roller chain with a vernier caliper, you can also use a tape measure, but to reduce measurement error, measure as many links as possible.
- (9) Lambda Chain- Long-life Lambda Chain may run out of oil when the chain elongation reaches about 0.5%. As a guideline for this, red wear debris will appear between the plates and the chain will begin to bend poorly.
Reference length and 1.5% elongation dimensions In case of 6-link judgment Judging 10 links Reference length Judgment dimensions Reference length Judgment dimensions RS25 38.10 38.67 63.50 64.45 RS35 57.15 58.01 95.25 96.68 RS41 76.20 77.34 127.00 128.91 RS40 76.20 77.34 127.00 128.91 RS50 95.25 96.68 158.75 161.13 RS60 114.30 116.01 190.50 193.36 RS80 152.40 154.69 254.00 257.81 RS100 190.50 193.36 317.50 322.26 RS120 228.60 232.03 381.00 386.72 RS140 266.70 270.70 444.50 451.17 RS160 304.80 309.37 508.00 515.62 RS180 342.90 348.04 571.50 580.07 RS200 381.00 386.72 635.00 644.53 RS240 457.20 464.06 762.00 773.43
7.4 Inspection of hanging and trolley towing
- 1. Carry out the same procedure as for the wrapping transmission in the previous section (7.3).
- 2. It is important to check the oil supply status at the connection points between the roller chain and End fixture where the roller chain wraps around the sprocket and articulate, and where End fixture fittings are attached.
- 3. When checking the wear and elongation of the roller chain, check the points where the roller chain articulate as it wraps around the sprocket.
- 4. Check the roller chain for twists and side bends. If there is any localized twist or side bend, replace the entire roller chain (Figure 32).
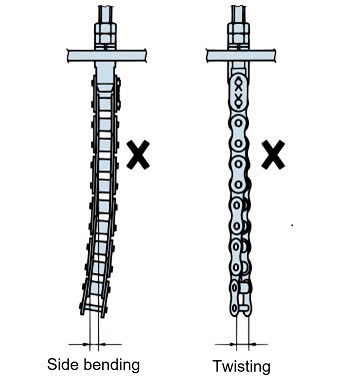
Figure 32: Twist in a roller chain
- 5. End fixture
Check the connecting holes for wear, deformation, or damage. If they are deformed or damaged, replace them immediately.
The gap between the pin holes in the metal fittings affects the lifespan of the roller chain, so it is designed to be as small as possible.

7.5 Storage
Store replacement parts such as roller chains, sprockets, and End fixture in a place that is not subject to high temperatures, humidity, or dust.
When storing the removed roller chain, clean it, then soak it in lubricating oil and allow the oil to soak into the gaps in the roller chain. Then, wrap it completely in oiled paper and store it.

